TUTORIAL: CREATING STATIC MESHES IN CINEMA 4D
Short Overview
In this tutorial we will use Cinema 4D to create a Static Mesh for Unreal Tournament 2003+, texture it and import it into UnrealEd.
Intro
Knowledge neede : polygonal modeling, UVW, selections, texture-tools
Software needed: , the free for C4D (which you can download here) and of course .
Extract the Plugin into C4D's "Plugins"-Folder and start Cinema 4D.
Setting up Cinema 4D
First we'll make C4D ready for snapping: Go to -> , and set to 16 and to 8. Now between two lines of your grid there are 16 Units and between every two major lines there are 128 Units. (Caution: You might want to set to None. The problem with it is that it can't be set to a power of 2. And if you set it to 10 and zoom out or in, the major lines will no longer be correct. If you don't want to turn it off, set it to 1..2..5..10 - this way at least the first zoom-step in either direction will still be correct...) Change to the tab and make sure and are checked. Now (Above the Options tab) and you're done. Your grid is now ready for point-exact static-mesh-creation.
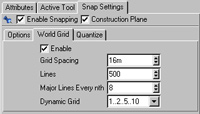
To work with snapping is very important if you want to create several meshes, that align perfectly in UT, or if you want to align static meshes and brushes.
Modeling
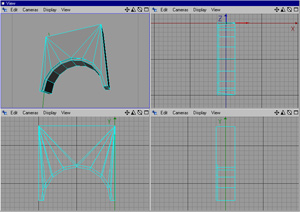
You can use all your Cinema 4D skills to create your model, but in the end it should be a single polygonal object. Since this tutorial is not as much about modeling as about turning C4D-models into UT-static-meshes, I'll just use a finished model of a bow:
I recommend removing (or disabling) the of your model, so you can see the polygons more easily.
Smoothing Groups
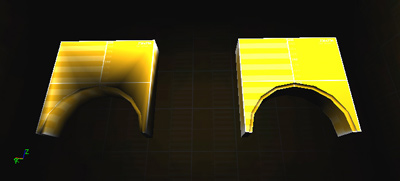
Upfront I'd like to illustrate what smoothing groops are for. Take a look at the UnrealEd-screenshot below:
The bow on the left doesn't have smoothing groups, so UT handles it as if all polys were in one big smoothing group. Notice how it trys to smooth all around the object. The bow on the right has the smoothing groups well set (one for the front, one for the top, one for the back, one for the bow, et cetera). So everything looks the way it should.
Every group of polygons that you want to be one smooth group, you must mark as a Smoothing Group. You can do this, by switching to the polygon tool, selecting the polygons in question and turning them into a ( -> ). The of the Selection must be something like S:Name so, the ASE-Export-Plugin recognizes it. (You can change the name under the Basic Properties of the Polygon Selection Tag) To illustrate this point some more let's look at the two most importend smoothing groups of my bow:
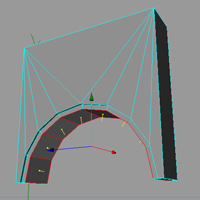
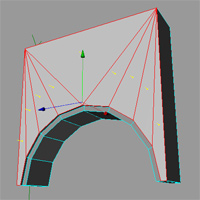
When creating a new Selection, make sure to unselect all the Selection Tags in the Objects Tab, or the active Selection Tag will be overwritten!
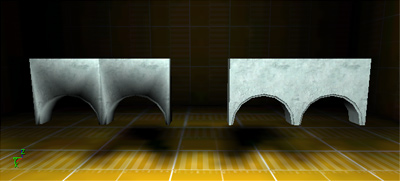
On the right you can see the group of polygons that build the front of the bow. This group is especially important since later on I want to take several instances of the same static mesh and create a line of bows:
With good the fronts of the two static meshes will look like one flat surface.
Basic Texturing
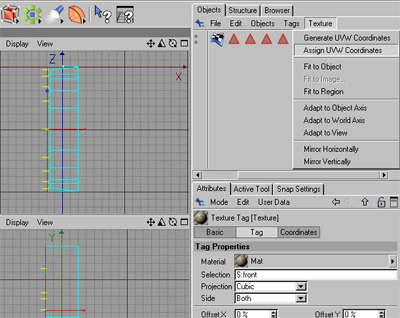
![]() If your object doesn't already have a , create one by following these steps: Drop a material on your object and set it's Projection to the method that fits your object best. (For the bow I used and furthermore did a -> ) Now select -> from the -Tab-Menu. Notice how in the tab, the Material's changes to .
If your object doesn't already have a , create one by following these steps: Drop a material on your object and set it's Projection to the method that fits your object best. (For the bow I used and furthermore did a -> ) Now select -> from the -Tab-Menu. Notice how in the tab, the Material's changes to .
If your object doesn't have a UVW-Tag UnrealEd will show an Error on importing the ASE, and most likely any applied texture will look wrong.
Ok. Texturing works like applying smoothing groups: Select a group of polygons and make a Polygon Selection. Name it something like M:Name. UT will now recognize it as a Material Group and you'll be able to assign a material to it (How to do this in UnrealEd will be explaned later on). (If Smoothing Group and Material Group match, you can use T:Name.)
Options for naming Selections:
M:Name - (Material Group)
T:Name - (Material and Smoothing Group)
S:Name - (Smoothing Group)
I'll now assign a texture to the front of my bow. I create a new Material with the texture-image in the color-channel, drop it on my object and change the Field of the to T:front. (I also change the name of the from S:front to T:front, since we now want it to be a and a in one.) Then I use the to place the Material. (If you want it to be tileable make sure the Texture's position is exact ( -> might often help)). Now I switch back to the , double-click my T:front so the polygon selection becomes active, click on the again and choose -> from the . This fixes the placement of the Material on the selected Polygons. Notice that the now shows UVW-Mapping as its .
If you are confused now, don't worry. Just follow through and hopefully it will all become clear. (If it does not, just try out different possibilities and see what it looks like in UT.)
Export to ASE / Import to UT
Select -> -> and save the object to your desired location.
It's not really necessary to triangulate your object since this will happen automatically, but if you get strange results in UT, triangulate it yourself in C4D and check that everything still looks ok. (With the object selected: -> )
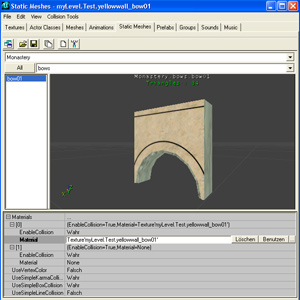
Open and open the . Within the Static Meshes Browser Window select -> and import the ASE-File you created. Enter a -Name (Either a new name, or the name of the package that you want to add the object to), a -Name and a for the object. (I'll use Monastery for the Package, bows for the Group and bow01 as the name.)

The object is here, but the textures are gone. This is because Unreal Tournament can not read Textures that are not in the Texture Browser (by the way: the ASE-Plugin doesn't even save the Texturepath) So what we have to do is to just import the exact same Textures that we used in Cinema 4D to Unreal Tournament and assign them to the object. (You may have to convert your texture to one of the formats UT reads - see next chapter) So why did we even use the Textures in Cinema 4D? We could have left them out completely and could have just created the Polygon Selection Tags, but then we would not have known exactly what it was going to look like - That's why.
Intermission: Importing Textures to UnrealEd
Upfront there's something very important to say: If your Texture is not in the right size or colormode, UnrealEd will just not import it. (It doesn't even display an error.) So if your import doesn't work, resize your File or change its color settings and try again.
Restrictions: (taken from this page at wiki.beyondunreal.com)
- Filesize must be a power-of-two number of pixels across (64x128, 256x256, ...) up to 2048x2048.
- Files must be saved in .pcx, .bmp, targa, DXT or UPaint file format
- Files must have 8-bit indexed color (256 color indexed) for PCX; 24-bit or 32-bit BMP, TGA or DDS
(... MISSING STUFF ...)
Don't forget to save your package, or the textures you imported will not be visible ingame. The same goes for your Static Mesh Package!
Assigning the Textures to the Static Mesh
In the , select the Texture you just imported. Change to the and click on the "+" where it says . Open the first entry () and click on Now click the Button and the Texture you selected in the Texture Browser will be applied. (You have to click in the to see the changes. If you don't see a change, move around the object to make sure you're facing it from the right side...)
You will have noticed that there's a second Material entry ([1]). This one covers the rest of the object, since we didn't create Material Groups for all the polygons. You can assign a texture to it, but it will probably not look too good. It's best to completely texture the object in C4d...
If you've come this far, use the Collision Tools to add a Karma Primitive and then you're ready to put your object into a test map...
Different Skins for the same Static Mesh
It is possible to use the same Static Mesh with different textures. Place a Static Mesh in your Level, open the and add a new Material under -> . The layers you create here simply override the Materials you assigned in the .
Some Random Modeling Advice
If you're working with , it's unlikely that you get the best possible solution. But often you can improve your object by deleting a few unnessessary edges and points and redrawing the polygons with the Tool
Outro and Where to go from here
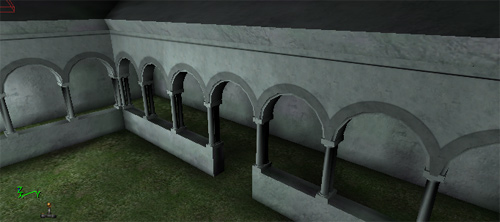
The finished model of the bow in action (Screenshot from within UnrealEd)
Thanks for reading this tutorial. Please feel free to send comments and suggestions to markus[at]kapturak.com
The textures mentioned in this tutorial and many other textures can be freely downloaded from our texture archive at Stocktextures.com (powered by ONCE Entertainment)
Valuable resources can be found at beyondunreal, UDN, Maxon, etc.
